POCKET PC PDA: Signal Generator Example
Create a simple software application to playback audio
signal waveform files using your Pocket PC PDA. Using
third party software programs like: Test Tone Generator
and NCH Tone Generator to create a variety of waveform
files. Sine, Square, Triangle, SawTooth and Impulse
waveforms at many different frequencies can be generated
and saved as (.wav) sound files. We can store many
files on to a SD or Compact Flash memory card and play
them back using a Pocket PC PDA. We can organize
the audio signals that we use the most and play them
back when needed at the touch of a button. We can use
these signals to test and troubleshoot our analog hardware
designs. Lets get started !!!
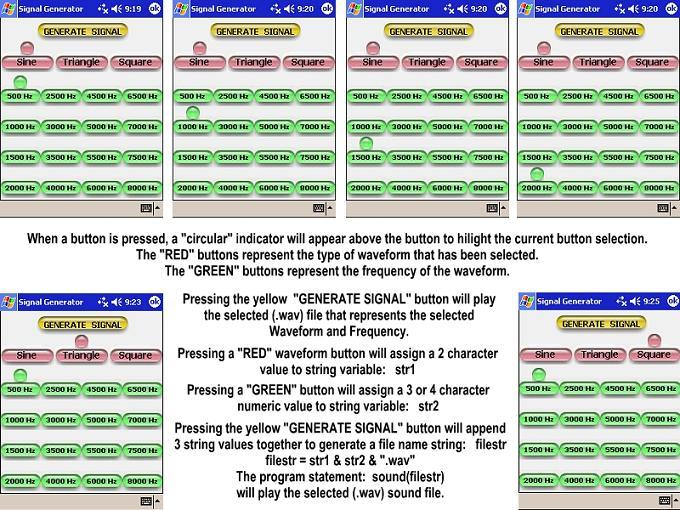
The software application is very simple.
We simply select the type of waveform
that we want and then we select the
frequency of the signal. When we
press the "GENERATE SIGNAL"
button the PDA will simply play
back the selected audio (.wav) file.
Here is a simple description of how the software application operates.
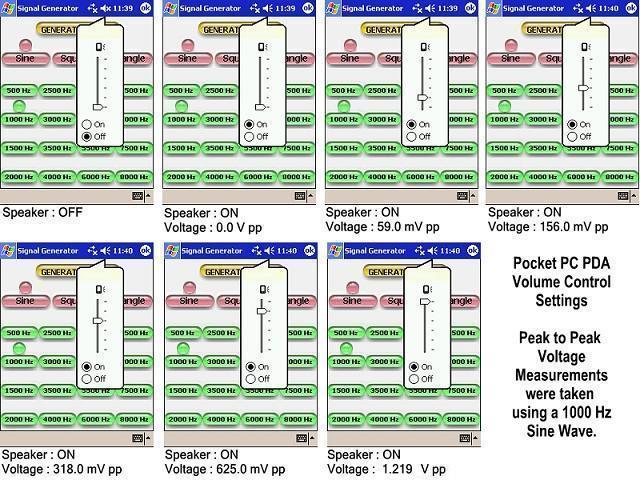
Pocket PC PDA Volume Control Test Results using a 1000 Hz Sine Wave.
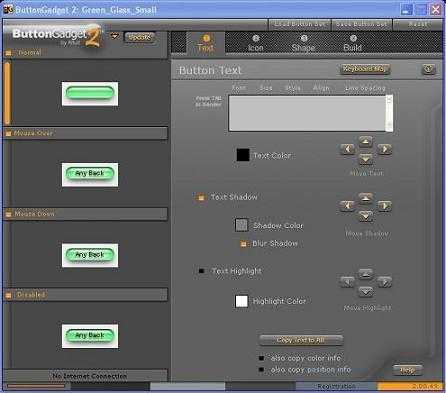
The Buttons for this application were created using "ButtonGadget2" and
"Microsoft Paint" was used to modify the JPEG images when necessary.
The program code for this example was created using the BASIC4PPC Basic Compiler for the Pocket PC. The program code for this application is listed below:
Sub Globals
str1=""
str2=""
filestr=""
indstr1=""
indstr2=""
End Sub
Sub App_Start
Form1.show
image1.Visible=false
image2.Visible=false
image3.Visible=false
image4.Visible=false
image5.Visible=false
image6.Visible=false
image7.Visible=false
image8.Visible=false
image9.Visible=false
image10.Visible=false
image11.Visible=false
image12.Visible=false
image13.Visible=false
image14.Visible=false
image15.Visible=false
image16.Visible=false
image17.Visible=false
image18.Visible=false
image19.Visible=false
indstr1="sr.jpg"
indstr2="sg.jpg"
End Sub
Sub ClearIndicator1
image1.Visible=false
image2.Visible=false
image3.Visible=false
End Sub
Sub ClearIndicator2
image4.Visible=false
image5.Visible=false
image6.Visible=false
image7.Visible=false
image8.Visible=false
image9.Visible=false
image10.Visible=false
image11.Visible=false
image12.Visible=false
image13.Visible=false
image14.Visible=false
image15.Visible=false
image16.Visible=false
image17.Visible=false
image18.Visible=false
image19.Visible=false
End Sub
Sub ImageButtonSine_Click
ClearIndicator1
image1.Image=indstr1
image1.Visible=true
str1="si"
End Sub
Sub ImageButtonTriangle_Click
ClearIndicator1
image2.Image=indstr1
image2.Visible=true
str1="tr"
End Sub
Sub ImageButtonSquare_Click
ClearIndicator1
image3.Image=indstr1
image3.Visible=true
str1="sq"
End Sub
Sub ImageButton500Hz_Click
ClearIndicator2
image4.Image=indstr2
image4.Visible=true
str2="500"
End Sub
Sub ImageButton1000Hz_Click
ClearIndicator2
image8.Image=indstr2
image8.Visible=true
str2="1000"
End Sub
Sub ImageButton1500Hz_Click
ClearIndicator2
image12.Image=indstr2
image12.Visible=true
str2="1500"
End Sub
Sub ImageButton2000Hz_Click
ClearIndicator2
image16.Image=indstr2
image16.Visible=true
str2="2000"
End Sub
Sub ImageButton2500Hz_Click
ClearIndicator2
image5.Image=indstr2
image5.Visible=true
str2="2500"
End Sub
Sub ImageButton3000Hz_Click
ClearIndicator2
image9.Image=indstr2
image9.Visible=true
str2="3000"
End Sub
Sub ImageButton3500Hz_Click
ClearIndicator2
image13.Image=indstr2
image13.Visible=true
str2="3500"
End Sub
Sub ImageButton4000Hz_Click
ClearIndicator2
image17.Image=indstr2
image17.Visible=true
str2="4000"
End Sub
Sub ImageButton4500Hz_Click
ClearIndicator2
image6.Image=indstr2
image6.Visible=true
str2="4500"
End Sub
Sub ImageButton5000Hz_Click
ClearIndicator2
image10.Image=indstr2
image10.Visible=true
str2="5000"
End Sub
Sub ImageButton5500Hz_Click
ClearIndicator2
image14.Image=indstr2
image14.Visible=true
str2="5500"
End Sub
Sub ImageButton6000Hz_Click
ClearIndicator2
image18.Image=indstr2
image18.Visible=true
str2="6000"
End Sub
Sub ImageButton6500Hz_Click
ClearIndicator2
image7.Image=indstr2
image7.Visible=true
str2="6500"
End Sub
Sub ImageButton7000Hz_Click
ClearIndicator2
image11.Image=indstr2
image11.Visible=true
str2="7000"
End Sub
Sub ImageButton7500Hz_Click
ClearIndicator2
image15.Image=indstr2
image15.Visible=true
str2="7500"
End Sub
Sub ImageButton8000Hz_Click
ClearIndicator2
image19.Image=indstr2
image19.Visible=true
str2="8000"
End Sub
Sub GenerateSignal_Click
filestr = str1 & str2 & ".wav"
Sound(filestr)
End Sub
This program supports:
16 Sine Wave Files
16 Square Wave Files
16 Triangle Wave files
These (.wav) files have to be created
on a PC first using programs like:
"Test Tone Generator"
"NCH Tone Generator"
The (.wav) files can then be loaded
onto SD or Compact Flash memory
cards and moved over to the
Pocket PC.
In this example, the JPEG button
image files and the (.wav) files were
copied into the "My Documents"
directory on the Pocket PC before
the BASIC4PPC application is run.
When you play back the sound files
and look at the waveforms on an
oscilloscope, they look pretty good.
They are good enough to be used
for basic analog circuit testing. If
the signals need some work first,
you can always buffer, filter and
condition the signals to get them
into better shape before running
them into your analog circuits.
By using a Pocket PC, we can control
when a signal is injected into a circuit
with simple programming. Using a
serial port connection: a hardwired
cable or Bluetooth, we could setup
an external piece of test equipment
to take a measurement, inject a signal,
take the actual measurement and store
the results in a file on a SD or Compact
Flash memory card.